The Disc Replacement Book
By Jim Rider
Disc Replacement Procedure – Dr. Jan Spiller, Chief Orthopedic Surgeon
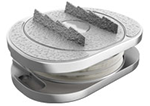
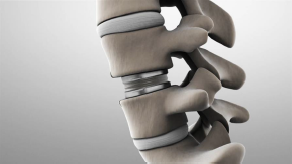
Let me describe a disc replacement surgery for you, using as an example a lumbar disc replacement procedure. The cervical variation of the surgery is extremely similar, so much of what I share here applies to cervical procedures as well. To make this easier to understand, I want to include some illustrations of disc replacement using the M6 artificial disc from Spinal Kinetics:
First, our surgical team has found that lumbar disc replacement is best accomplished using what is called an anterior retroperitoneal approach. This simply means we go in from the front of the abdomen and work around and behind the peritoneum or intestinal sac. By staying outside the intestinal sac, we have to pierce fewer membranes, which means fewer sutures and lower potential for complications. We begin with a small incision below and somewhat to the left of the navel or belly button. This incision is considered “minimally-invasive” because the incision is usually shorter than 10 cm (under 4 inches) in length. We work our way around the intestinal sac; there is no need to cut or separate any significant blood vessels, nerves, or organs. Shortly thereafter, we can clearly see the front (or anterior) portion of the lumbar spine.
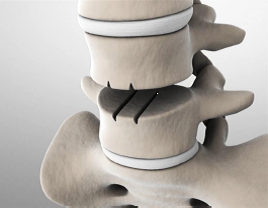
Using specially-engineered instruments, the existing, damaged disc is removed in its entirety. This includes removing any torn or separated portions of the degenerated disc and especially those portions that are pushing up against the nerve roots or spinal cord. While there, we perform a spinal channel decompression. We remove any bone growth or bone spurs that have grown into the spinal channel. This creates a clean surface for the spinal implant and removes the source of much pain in the spine.
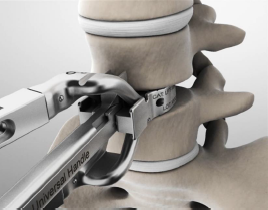
Next, we use a measuring tool, slipped between the vertebrae, in order to determine the proper footprint for the M6. The device is available with several different footprint sizes. Determining the proper one is very important.
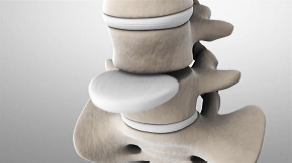
Next, with the damaged disc out the way, the original disc height is restored utilizing special instruments designed for this precise purpose. Restoring the natural disc spacing relieves a great deal of pressure on the surrounding structures.
We then carefully measure the vertebrae and disc spaces to determine the proper height and angle (lordosis) of the artificial disc. Fortunately, the M6 devices come in several sizes, heights and angles so a perfect match can be found.
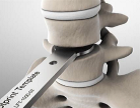
Using special tools, a temporary disc of the proper footprint, height, and angle is placed between the vertebrae as a sort of placeholder or marker. We then use a portable x-ray machine to take intra-operative x-rays of the spine and the temporary disc in order to make sure we will have the best location and alignment when we implant the permanent disc. Once we have verified (and only when we have verified) that the temporary disc is in the proper location, we proceed to the next step.
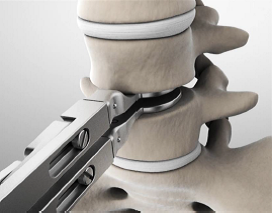
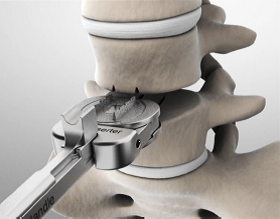
We next prepare the vertebrae surfaces to receive the artificial disc. A special tool is used to cut channels in the vertebrae. The channels hold the “keels” of the artificial disc and help it to stay in place.
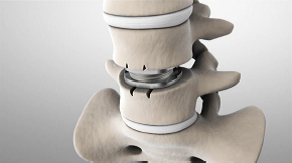
With the surrounding vertebra properly prepared to accept the disc, the disc is then pushed into place. The serrated keels of the disc will line up perfectly with the channels previously cut by the surgeon. These channels guide the disc into place, and the serrated shape of the keels will help to immediately hold the disc in place between the two vertebrae.
With the artificial disc in place, another intra-operative x-ray is taken from several angles to verify the artificial disc is perfectly located in the spine. The new disc will mate perfectly with the vertebrae above and below it. In fact, the new disc and the vertebrae above and below it fit so well together that no cement, screws, or other devices are needed. This initial or primary stability (as we call it) is so stable, the patient will be able to get up and move around in the next 12-24 hours without fear of any movement or migration of the artificial disc. The top and bottom surfaces of the disc are also coated with a titanium plasma spray to promote bone ingrowth and fusion between the disc and the surrounding vertebrae. Ultimate stability occurs within 6 weeks.
Once we are satisfied with the result, then we can begin closing the surgical site or instead move on to replace another adjacent disc if indicated.
From start to finish, disc replacement surgery usually takes our team less than 75-minutes, and that includes 2- and 3-level disc replacements as well. These procedures can be done in a very efficient manner because of the number of surgeries we have performed together as a team and due to the fact that we perform disc replacements many times a week on average. Because the surgery is short, the patient is under anesthesia for only a short time. In addition, due to the minimally invasive manner in which we perform the surgery, blood loss is very minimal, usually less than seven ounces.
Cervical disc replacement is very similar. The greatest difference is the nature of the approach. We enter through a small incision in the neck, to one side of the esophagus. We are able to work around this and other structures to visualize the front (or anterior) portion the spine. The preparation and execution of the disc implantation is essentially the same, except with somewhat different tools and much smaller artificial discs.
Surgery times for fusion vary depending upon the nature of the procedure and the skill of the surgical team, but a timeframe of two to three hours is not uncommon. The typical ADR surgery performed by our team takes less than 75 minutes. The effects of this are profound. Less time on the table means less time under anesthesia.
One of the great advantages to disc replacement, however, is that it can be performed quite quickly if it is done by an experienced surgical team.
disc replacement performed by our surgical team takes only 1.25 hours on average. Our team is so skilled at disc replacement that each member of the team knows his or her role backwards and forwards. We can approach each surgery with skill and precision because we have done these procedures literally thousands of times. Thus, surgeries are performed more accurately and more efficiently. Increased accuracy leads to better outcomes and lower complication rates. The increased time savings often allows us to perform both lumbar and cervical disc replacement in the same surgery without keeping the patient under anesthesia for too long. The brief duration of surgery, minimal blood loss, and ease of recovery make simultaneous lumbar and cervical disc replacement not only feasible but often desirable. Patients who have degenerative disc disease in both their lower back and neck can often benefit from having both procedures done on the same day.
Keep in mind, the ADR surgery durations quoted above are from our team. We have a team of surgeons and support staff used to performing ADR surgery on a frequent basis. In fact, we perform ADR surgery more than 250 times a year, and we have performed thousands of such surgeries. Other surgeons may not enjoy the advantages of such an experienced team. Some surgeons who perform ADR surgery do so a handful of times a year. There are days where our team performs that many ADR procedures in a day. This makes a substantial difference in surgery times and outcomes.
Our surgical team also employs the “Cell Saver” device. Most of the blood lost during surgery is collected in a centrifuge. If for some reason there is more than normal blood loss, we have the option of spinning and cleaning the patient’s blood and giving it back to him or her. This reduces the impact of surgery and helps avoid any need for additional blood transfusion with someone else’s blood.
– Dr. Jan Spiller, Chief Orthopedic Surgeon
Next Chapter –Disc Replacement Studies > >
The Disc Replacement Book – A Back in Motion
By Jim Rider